Edited April 2026
Follow this easy step-by-step photo tutorial and learn how to paper-piece the sun block. You will become a paper-piecing pro! Make one and use it as a wall hanging, add a few to your quilt, or make a whole quilt with it.

I made this 10″ block to test a pattern I was writing (I trimmed it slightly after I took the photo). I used these fabrics (not oranges or yellows) because I am trying to get more blocks ready for a sampler quilt with this collection. It came out gorgeous (if only I had pressed it better).
I find that when I use starch on certain blocks, the seams look funny. Does it happen to you, too? Once I learned to use starch on finished blocks, I never stopped. Oh, well. I work with colorless Best Press, which I purchase by the gallon. Why? I starch all the fabrics before I cut them for a project (never before I store them), and then every block. I do not starch the quilt top once I finish it.
So, are you ready to see how I made this block? It is very detailed, so you won’t have any trouble making yours. The steps will work regardless of the size of the block you need to make for your quilt.
How to paper piece a sun block
What you will need:
Paper to print the sections (Download templates for 10″, 12″, and 16″ blocks by clicking here)
Plastic for templates if needed
Note: I always worked with an old credit card or postcard to help when folding the paper back to trim the seams, an Add-a-quarter ruler that has a ridge and aligns nicely with the folded paper to trim the seam to 1/4″, and a roller thingy to ‘finger press’ each section. However, I have done this so many times and found that you really do not need anything special. The Add-a-quarter ruler is narrower than the regular acrylic ruler we use, and it does not wobble over the pins when trimming each section. So, it may be worth getting it.
- Print templates and cut fabric pieces

I used to purchase special paper-piecing or foundation paper, the same thing, until the day someone told me she prints all the templates with her printer on regular paper. Guys, the best advice! The paper is super easy to rip at the end. If your templates are in a book, scan and print/copy them. Important: Please check the size of your printed or copied templates against the published original! Sometimes, if your printer settings are not set to No Scaling, the templates will print larger or smaller than the original, and the block will not come out to size.
For the sun block, the sun rays are paper-pieced, and the other two parts, the inner circle and the corner, will be traced onto the back of the fabric and cut with scissors; that is why I traced those sections onto plastic for a template and cut out the outline.
How can I determine the size of each fabric piece? The patterns usually indicate it.
When you learn how to paper-piece the sun block, you will be able to paper-piece any block, as the steps are the same! Here, you sew with curves. Yet many blocks include no curves at all, and putting them together is a breeze. Look at these tulips I paper pieced (video tutorial). So fun!
2. Pin the first two fabric pieces onto the paper


Notice that I always check against a light or window to make sure the fabric extends beyond the seam lines all around. Yes, paper-piecing takes more fabric than regular piecing, but some projects cannot be done with templates or regular piecing.
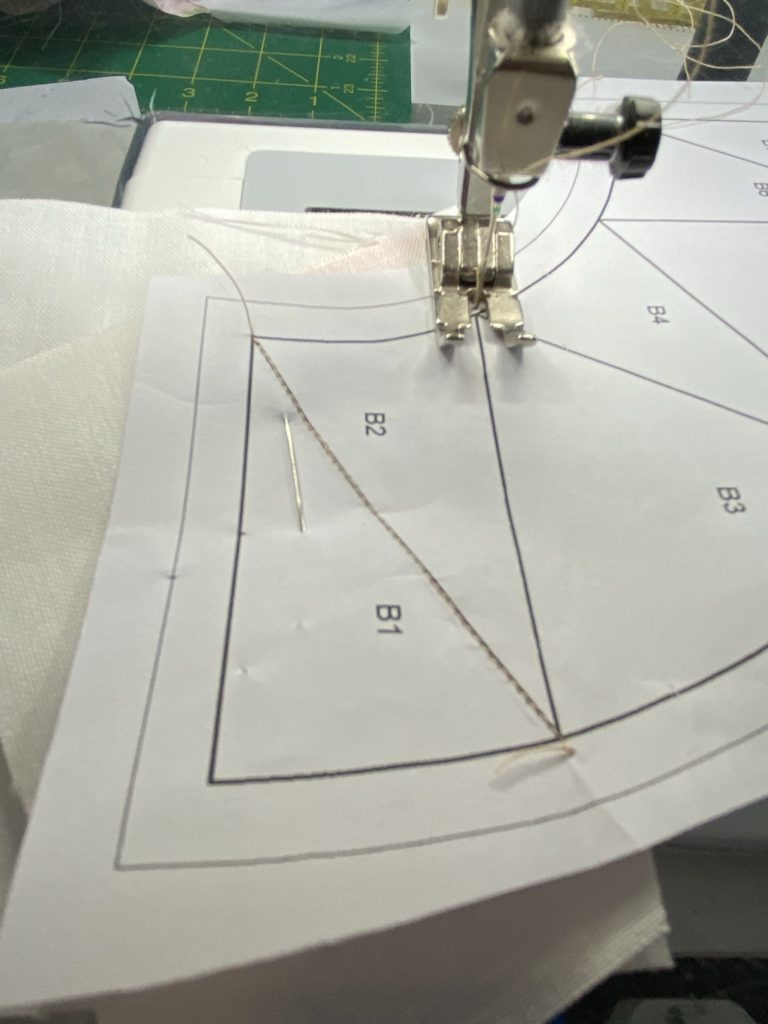
After pinning the fabric (right side facing you, backside of fabric touching paper) to the back of the template, flip to the printed side of the template, fold it back on the line between sections 1 and 2, exposing the back of the first piece of fabric, and trim the fabric to 1/4″. Yep, you haven’t sewn anything yet, and you are already trimming the seam. Then align and pin the section 2 fabric with the section 1 fabric, right sides together.
Oh, when pinning, be sure to place the pin a bit far away from the stitching line, or the presser foot will touch the pin’s head, and you will sew outside the line. Ask me how I know.
3. Stitch fabrics to the paper


The first thing you need to do is set the stitch length to 1.6 or 1.8, since you’ll need tiny stitches to make it easier to remove the paper later. The flip side of tiny stitches? When you make a mistake and need to remove them… but, luckily, it does not happen often, unless you get distracted and do not sew on the line.
Next, stitch on the printed side of the paper on the line between sections 1 and 2, flip the template and finger-press the fabrics open, fold back the template on the line between sections 2 and 3, and trim the seam to 1/4″.
I added the last photo to the gallery above out of order, on purpose, to remind you: check that the fabric piece does not get rolled back as you place the paper under the presser foot. Or you will have to rip the stitches to fix it.
4. Repeat for each section of the template


Pay attention as you repeat the steps so you use the correct fabric for each section. For this block, the first and last sections take a narrow White rectangle, the middle sections take a wide White rectangle, and the sun rays are all the same size in a pink print.
Paper piecing is very calming because of the repetitive steps. I usually do not have music or a book playing because I want to focus entirely on the work. It is a time for mindful meditation for me – when I focus intensely on a task, I am meditating. As you learn how to paper-piece the sun block, you might feel the same way!
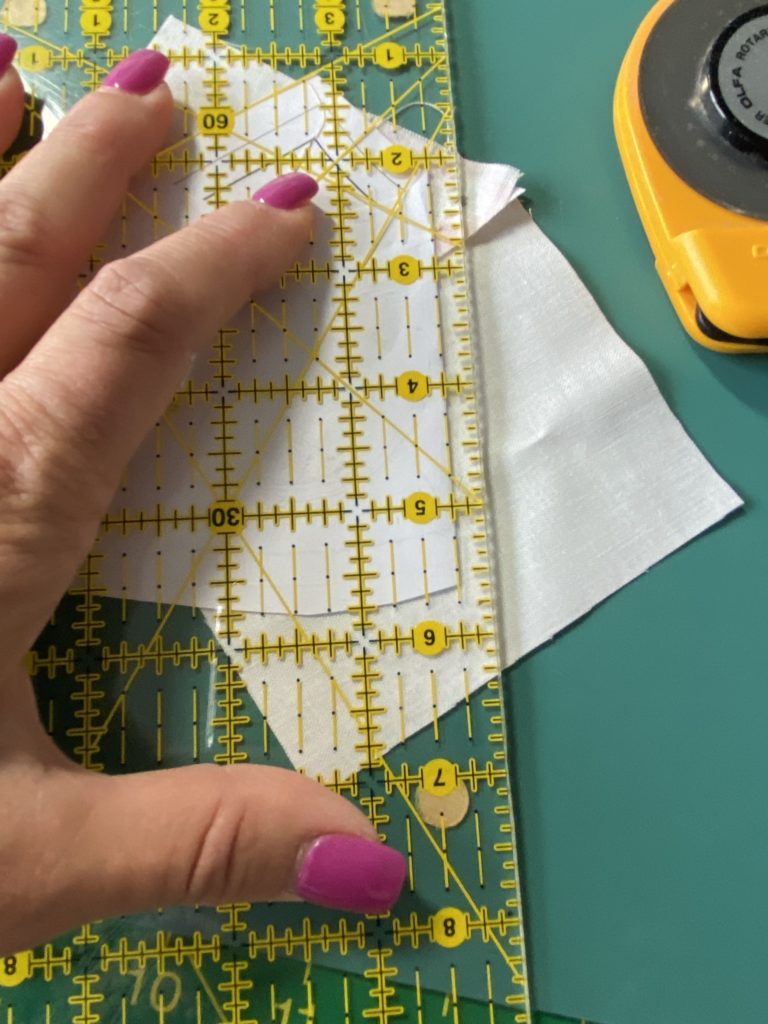
5. Trim patch and remove paper.


When all the sections are stitched, press the patch, trim to 1/4″ using sharp scissors, and remove the paper. Note: We are using scissors, not a rotary cutter, because this is a curved piece. Otherwise, trim around using a rotary cutter.
To remove the paper, be sure to hold down the beginning of the stitching line so it will not go undone. If it does, no problem, just stitch the seam again. You will notice how easy it is to rip the printer/copier paper. For the points, you may need to use tweezers to remove stubborn pieces.
It is not a good idea to leave paper on the patch. Once, I saw a blog tutorial that said it was OK to leave pieces of paper attached because they lent character to the quilt. What? The paper will be between the block and the batting, so no one will see the ‘character’, but the black lines of the template may show through the fabric or, worse, we may end up with a gunky mess once the quilt is washed.
6. Stitch the quarter circle and the corner


Pin the quarter circle liberally to the pieced section, change back the stitch length to the regular size of 2.4, and stitch. Notice in the bottom center photo how I messed up the beginning of the seam. That won’t do. So, I stitched it correctly and then ripped the stitches with faithful Jack, the seam Ripper.
I bet you are wondering if I won’t break the needle when stitching over the pins. I did! That only happens when I am using a thin needle (70/10). Otherwise, that does not happen often.
7. Stitch the corner and snip the curves


You see, the pins are about 3/8″ apart or less, and after stitching this section, I snipped the curves, both the quarter circle and the corner, so they will lie flat.
I repeated all the steps above to make the other three quarters, then joined them and trimmed the block. It is best to chain piece all quarters one section at a time – this way, you are working with the same fabrics and same sections, and there is less chance of making a mistake.

Super easy. It would have been a lot faster if I had not stopped to take photos. But, if you are to learn how to paper-piece the sun block, I am sure you appreciate detailed tutorials, right? I actually took 67 photos but didn’t use all of them; otherwise, this post would have been much longer…
I hope this is helpful! I forgot to mention that the product links are affiliate links. And that is it for today. Have a fantastic sewing day!

I love to paper piece. Thanks. My son calls me old school, but I am not a video person until I have read the instructions and then I watch if I need help.
Thanks
We have that going for us, right? We read the instructions first! You would be surprised if you knew how many quilters begin a pattern without reading the instructions to the end first.
Love the block Denice. Thanks for sharing!
Thanks! I want to make a few with orange and yellow batiks. Batiks don’t wiggle much when you press them, too.
Hi Denice, you are so very NICE to share this🥰. I will print it out and try it.
Your block looks super cute. Now I have to look for cute fabrics too,
I will try both sizes just for kicks, and to see which size is cooler too.